Deploy from Visual Studio (Web Deploy)
Publish an ASP.NET or .NET application straight from Visual Studio using a publish profile.
Web Deploy is the fastest way to publish an ASP.NET or .NET application from Visual Studio. You download a publish profile from the Control Panel once, and from then on every deployment is a single click.
Note
Web Deploy uploads only the files that changed since the last publish, so repeated deployments are much quicker than re-uploading the whole site over FTP.
Before you start
- A website created in the Control Panel.
- Visual Studio 2022 with the ASP.NET and web development workload installed.
- A project that builds and runs on your computer. If you do not have one yet, create it in Visual Studio from the ASP.NET Core Web App template.
Download the publish profile
Open your website in the Control Panel
Sign in, go to Websites and select the website you want to publish to.
Open the Deploy page
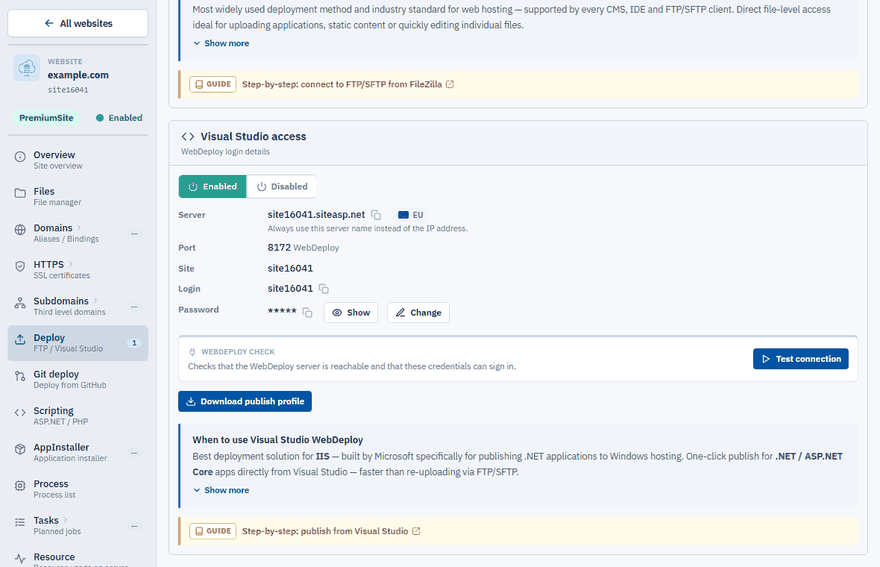
In the left menu choose Deploy and find the Visual Studio access card.
Enable WebDeploy
Switch WebDeploy to Enabled. The login details on the card become available.
Download the profile
Click Download publish profile and save the
.publishSettingsfile to your computer.
Tip
Use the Test connection button on the same card to check that the Web Deploy server is reachable and that your credentials work.
Publish from Visual Studio
Start the Publish wizard
In Solution Explorer, right-click your project and choose Publish.
Import the profile
Choose Import profile and select the
.publishSettingsfile you downloaded.Publish
Click Publish. Visual Studio builds the project and uploads it to your website. When it finishes, your site opens in the browser.
During the publish the website is stopped for a moment and started again automatically, so you do not have to recycle the application yourself.
Something went wrong?
The site shows an error after publishing
The deployment worked, but the application does not start. See HTTP Error 500 – the application failed to start for how to read the logs and for the most common causes.
Error 401 – unauthorized
The login details in the publish profile are no longer valid.
- Check that WebDeploy is still Enabled on the Deploy page.
- After changing the Web Deploy password you have to download the publish profile again and import it into Visual Studio.
- Each website has its own publish profile. A profile downloaded for one website does not work for another.
Visual Studio cannot connect to the server
Web Deploy connects to our servers on TCP port 8172. If the connection times out, something on your side is blocking that port — a firewall, antivirus software, the router or your internet provider.
To test it, open this address in a browser (replace siteXXXX with the server name of your website from the Deploy page):
https://siteXXXX.siteasp.net:8172/msdeploy.axd?site=siteXXXX
If a dialog asking for a login and password appears, the port is open. If the page does not load, allow outgoing connections to port 8172 or try another network. The Test connection button on the Deploy page tells you whether Web Deploy works on the server side.
Files are in use
Web Deploy stops the application before uploading, so this should not happen. If you upload over FTP instead, see Files are locked during deployment.