Upload files with FTP or SFTP
Connect with FileZilla or any other FTP/SFTP client and upload your website to wwwroot.
FTP and SFTP give you direct access to the files of your website. They work with every FTP client, IDE and CMS, and are ideal for uploading static content or quickly changing a single file.
Tip
Publishing a .NET application? Web Deploy from Visual Studio is usually faster, because it uploads only the files that changed.
Find your login details
Open your website in the Control Panel
Sign in to the Control Panel, go to Websites and select your website.
Open the Deploy page
In the left menu choose Deploy. The FTP / SFTP access card shows everything you need.
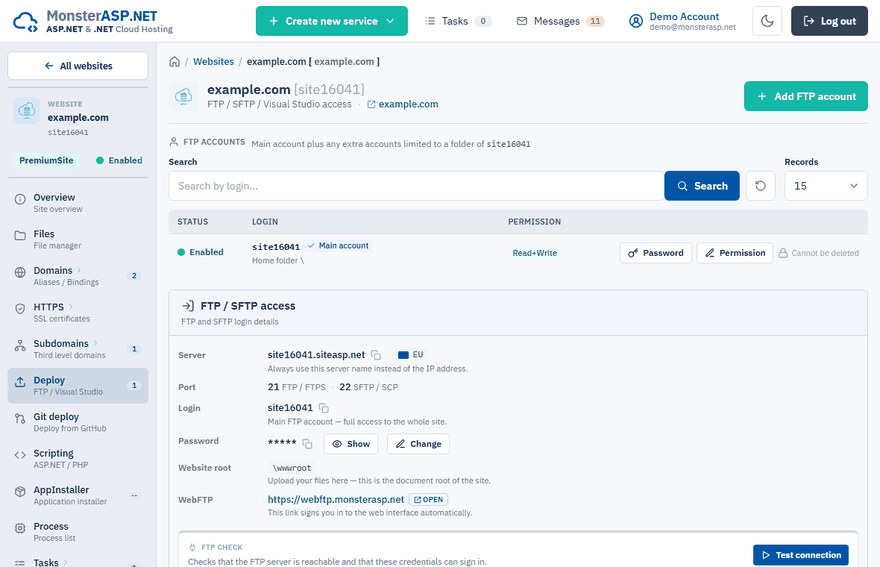
| Field | What it is |
|---|---|
| Server | The server name to connect to. Always use this name instead of an IP address. |
| Port | Separate ports for FTP / FTPS and for SFTP / SCP. |
| Login | The main FTP account, with full access to the whole website. |
| Password | Click Show to reveal it or Change to set a new one. |
| Website root | \wwwroot — the document root of your website. |
Use the copy icon next to each value so that you do not mistype it.
Important
Prefer FTPS or SFTP. With plain FTP your password and files travel over the internet unencrypted.
Connect with FileZilla
FileZilla is a free client for Windows, macOS and Linux. Any other FTP/SFTP client works the same way.
Open the Site Manager
In FileZilla choose File → Site Manager and click New site.
Enter the connection details
Choose the protocol (SFTP or FTPS) and copy the Server, Port, Login and Password from the Deploy page.
Connect
Click Connect. The first time you connect, confirm the server certificate or host key.
Upload your files
Open the
wwwrootfolder on the server and upload the contents of your website into it.
For a one-off connection you can skip the Site Manager: fill in Host, Username, Password and Port in the bar at the top of the FileZilla window and click Quickconnect.
Once connected, FileZilla shows two panes — your local files on the left and the content of the website on the server on the right. Select files and folders on the left and drag them into wwwroot on the right to start the transfer.
Warning
Upload your files into wwwroot. After connecting you are one level above it; files placed there are not served by the web server and the website answers with 403 – Forbidden.
An ASP.NET Core application contains its own wwwroot folder for static files, so on the server you will see the path /wwwroot/wwwroot. That is normal.
Uploading a new version
A running application keeps its files open — they are locked by the web server (IIS) — so overwriting or deleting them over FTP can fail with a file is in use error. Typical messages in the FTP client are:
550 Cannot delete file - file in use
Permission denied / file locked
Stop the application first — with an app_offline.htm file or the Stop button in the Control Panel. See Files are locked during deployment.
Check the connection
If the client cannot connect, click Test connection on the FTP / SFTP access card. It verifies that the FTP server is reachable and that the credentials shown on the page can sign in.
No FTP client at hand?
Click Open next to WebFTP on the Deploy page. It signs you in to WebFTP automatically, so you can manage files from the browser.
Give someone access to one folder only
On the same page you can click Add FTP account to create an extra account limited to a single folder — handy for a developer or an upload tool that should not see the whole site. See Create an FTP account limited to a folder.