Enable HTTPS with Let's Encrypt
Turn on a free, automatically renewed SSL certificate for a domain.
Every domain connected to your website can have its own free SSL certificate from Let's Encrypt. You activate it once and it renews itself automatically.
Before you start
Important
The domain must already point to your website (DNS A or CNAME record). Let's Encrypt verifies ownership by reaching the domain over the internet before it issues the certificate. See DNS settings for custom domains.
Enable HTTPS for a domain
Open your website in the Control Panel
Sign in to the Control Panel, go to Websites and select your website.
Open the HTTPS page
In the left menu choose HTTPS. You see a list of all domains connected to the website.
Start the activation
Click Enable HTTPS on the row of the domain you want to secure. Let's Encrypt is the default choice.
Confirm
Click Enable HTTPS in the dialog. The certificate is issued and installed for you.
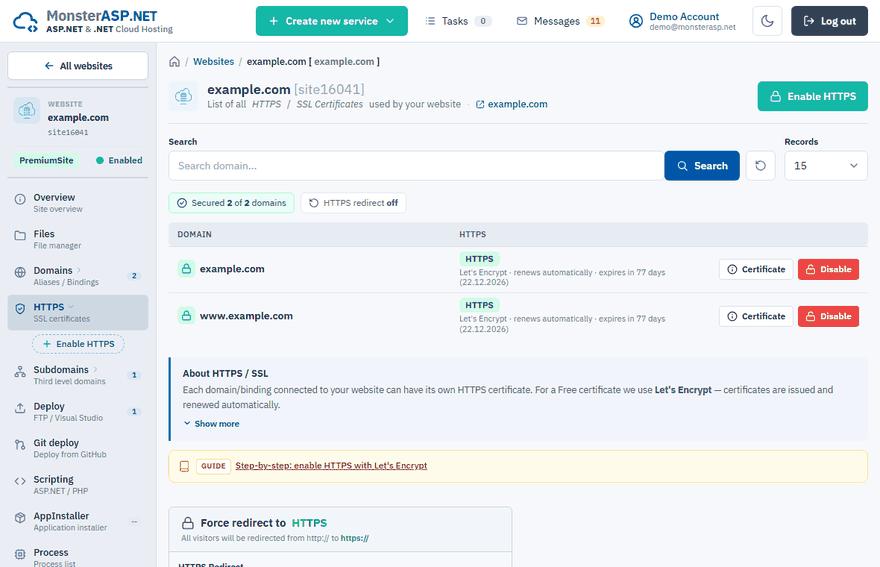
Activation itself is instant, but it can take up to 10 minutes before https:// works reliably for every visitor.
Note
Certificates are issued per domain. If your website has more domains or aliases, repeat the steps for each of them.
Free plan
On Premium plans HTTPS is included and you enable it yourself for all your domains as described above.
On the Free plan HTTPS is activated by our support team:
Upload your website first
Publish your application or content to the Free website. HTTPS cannot be activated for an empty website.
Open a support ticket
In the Control Panel open a ticket and ask for HTTPS to be enabled for your website.
Wait for the activation
We check the website and activate the certificate. It becomes active within a few minutes.
Warning
Do not sign in to the Control Panel through a VPN or a proxy. Our security system treats such connections as a risk and can switch the HTTPS option off for the account.
Renewal
There is nothing to do. A Let's Encrypt certificate is valid for 90 days. The certificate is renewed automatically every 90 days — as long as the domain still points to our server.
Redirect visitors to HTTPS
Once your site works over https://, switch HTTPS Redirect to Enabled on the same page. Every request to http:// is then redirected to its secure version.
Warning
Enable the redirect only after the site already works over https:// for every domain, and make sure your application is ready for HTTPS. Otherwise visitors can run into SSL errors or redirect loops.
More details: Redirect all visitors to HTTPS.
Troubleshooting
The certificate cannot be issued or renewed
Let's Encrypt has to reach your website on the domain. Check the DNS of the domain:
- The domain must point to our server — see DNS settings for custom domains.
- There must be only one
Arecord. If a secondArecord with the address of a previous hosting is left in DNS, the verification fails at random. Remove it for bothyourdomain.comandwww.yourdomain.com.
HTTPS works on one address but not on another
Each domain has its own certificate. Enable HTTPS separately for yourdomain.com, www.yourdomain.com and every other domain or subdomain of the website.
The application stopped working after enabling HTTPS
Some applications store their own address in their settings. If an application was installed on http:// and you enabled HTTPS later, update the address in the administration of the application as well (this is typical for nopCommerce and WordPress).
You use Cloudflare
See Use Cloudflare with your website for the recommended SSL settings.
Using your own certificate
If you already have a certificate from another certificate authority, you can upload it in the same dialog as a PFX file or as PEM/KEY files. See Upload your own certificate.