How to deploy Website content from command-line
This article contains steps how to publish your Application using WebDeploy command-line.
ASP.NET / .NET freehosting
If you don't already have our ASP.NET / .NET freehosting, sign up for FREE at https://MonsterASP.net/.
Description
WebDeploy is fastest and most reliable way to upload your application content to your website.
It’s especially useful for projects with many files (e.g. Node.js apps, Laravel apps) because it uploads only modified files using smart synchronization.
1) Check If WebDeploy Is Installed
Make sure WebDeploy is installed on your PC. Check if this folder exists:
C:\Program Files (x86)\IIS\Microsoft Web Deploy V3\
If this folder is missing or empty, you must download and install WebDeploy from official Microsoft page:
https://aka.ms/webdeploydownload
We recommend selecting Typical installation during setup.
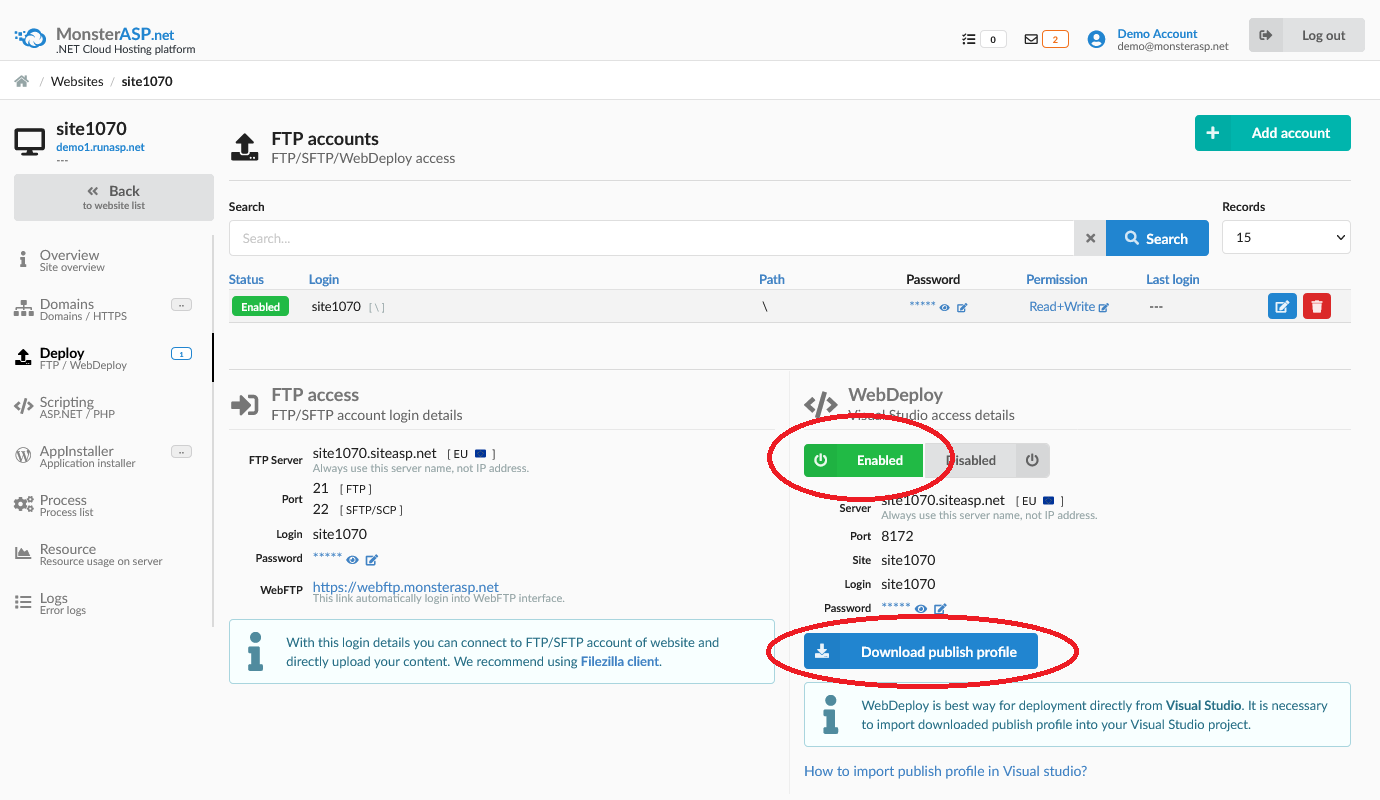
2) Enable WebDeploy in Control panel
Log in to our hosting control panel and enable WebDeploy for your website.
3) Create WebDeploy Batch file
Copy following BATCH code into new file and save it as webdeploy_to_monsterasp.bat:
@echo off
REM ====== MSDeploy: MonsterASP.NET command-line deploy ======

setlocal

REM ### Please fill necessary WebDeploy settings:

REM Local path to your project. All these files will be uploaded inside /wwwroot folder on server.
set SOURCE_PATH=C:\FULL_PATH_TO_YOUR_PROJECT\

REM Your website name like: siteXXXXXX
set DEST_SITE=siteXXXXX

REM Your website WebDeploy URL like: https://siteXXXX.siteasp.net:8172/msdeploy.axd?site=siteXXXX
set DEST_URL=https://siteXXXXX.siteasp.net:8172/msdeploy.axd?site=siteXXXXX

REM Your website name like: siteXXXXXX
set USERNAME=siteXXXXX

REM Your WebDeploy password
set PASSWORD=*****

"C:\Program Files (x86)\IIS\Microsoft Web Deploy V3\msdeploy.exe" ^
  -verb:sync ^
  -source:contentPath="%SOURCE_PATH%" ^
  -dest:contentPath="%DEST_SITE%",computerName="%DEST_URL%",userName="%USERNAME%",password="%PASSWORD%",authtype="Basic",includeAcls="False" ^
  -allowUntrusted ^
  -disableLink:AppPoolExtension ^
  -disableLink:ContentExtension ^
  -disableLink:CertificateExtension ^
  -verbose

endlocal
pause
4) Update variables in BATCH file
After save BAT file you must replace variables with your WebDeploy details which you can found in our Control panel.
set SOURCE_PATH= Full path to your local application folder (all folder content will be uploaded to /wwwroot folder on server).
set DEST_SITE= Your website ID: siteXXXXX
set DEST_URL= WebDeploy publishing URL. Just replace both siteXXXXX in this URL.
set USERNAME= Same as your website ID: siteXXXXX
set PASSWORD= Your WebDeploy account password. This password can be available in Control panel.
5) Run BATCH file
After update all necesarry variables double-click this webdeploy_to_monsterasp.bat file to run it.
If everything is configured correctly, you’ll see output like this:
Info: Using ID 'b9e156f1-5bc9-44ce-a42f-27273dc6ab35' for connections to the remote server.
Verbose: Pre-authenticating to remote agent URL 'https://site12345.siteasp.net:8172/msdeploy.axd?site=site12345' as 'site12345'.
Verbose: Performing synchronization pass #1.
Verbose: Pre-authenticating to remote agent URL 'https://site12345.siteasp.net:8172/msdeploy.axd?site=site12345' as 'site12345'.
Verbose: No backup was executed.
Verbose: Received response from agent (HTTP status 'OK').
Verbose: The dependency check 'DependencyCheckInUse' found no issues.
Verbose: The synchronization completed in 1 pass(es).
Total changes: 0 (0 added, 0 deleted, 0 updated, 0 parameters changed, 0 bytes copied)
Press any key to continue . . .
Congratulations! All done.
You’ve successfully deployed your application using WebDeploy from command line.
You can now update your website quickly and efficiently anytime with single run this deploy BAT file.